| |
|

The Purchase Entry window is used to create and manage purchases. You
may create a purchase with one or more lines, and with different expense accounts and VAT rates on each line, if you wish.
The first step in creating a purchase is to enter a date, an ID Number
and a Summary of the entry. It is important to put something into
the ID Number and Summary boxes, as these are the details which
appear in various lists in the program, and these are what you will
use when searching for entries.
Each purchase may have two addresses on it - a purchase address and a
delivery address. By default, the program enters your address into
both boxes when creating a new purchase.
After you have filled in these details, you are ready to fill in
the purchase lines.
Adding
A Line
To add a line to the entry, simply click the Add Line button.
The window below will now appear.
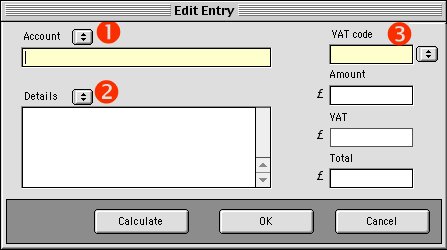
(1)
The first item to choose is the account you wish this line to be
allocated to. Clicking on the drop down arrow, brings up a list of
accounts from which to select.
(2)
You may now enter the details of this line. If you wish to use a
phrase which you have stored in the Standard Phrases window,
click the drop down arrow to bring up the list of stored phrases.
(3)
If you are tracking VAT, and you wish to use a VAT code on this
line, click on the drop down arrow beside the VAT box and choose a
code from the list which appears. You can then enter either the Amount
or the Total for the line, and click on the Calculate VAT
button to prompt the program to fill in the other amounts. It is
important to remember that although the program calculates what it
thinks the VAT amount should be, you are responsible for ensuring
this amount is correct. For example, in the case of spending money,
no matter what the program calculates the VAT amount to be, you have
to enter whatever you have been charged by your supplier.
Once you have finished entering the line, click the OK button
to return to the entry window, or click Cancel to reject the
line.
Editing
A Line
To edit a line, click on the line in the list, then press the Edit
Line button. The details of the line will appear using the same
window for new lines, as shown above.
Deleting
A Line
To delete a line, click on the line in the list, and then press the Delete
Line button.
As you add, delete or edit lines of the entry, the program
calculates the Subtotal, VAT Total and Total
amounts for the entry.
At the bottom of the window, you will see a comments box. These
comments appear at the bottom of a printed purchase. You may type the
comments into the box, or click the arrow above the box to choose
from the list of standard comments phrases.
Purchase
Status
The last thing that needs to be done to the purchase, is to choose
its status. There are four status options from which to choose...
Estimate: An estimate is a purchase which has been created,
but for which you have not yet been asked to pay. It has no effect
on any cashbook accounts, and is not treated as outstanding.
Quote: A quote is a purchase which is now due to be paid. The
payment is outstanding, and the number of days since the date on the
purchase will appear on the creditors list report, and will be shown
in this Purchase List screen.
Posted: A posted purchase is one which you have paid. In
terms of the program, it means that a new entry was made in the Spend
Money window to account for your payment.
Rejected: A rejected purchase is one where, for whatever
reason, the purchase was never posted to the cashbook accounts.
If you choose to select Posted, and close the purchase, a copy
of it will be turned into a cashbook Receive Money
entry, and will appear in the Receive Money window. From
there, you are free to post it to the cashbook as you would with any
other Receive Money entry.
A last note on the status. Different businesses use different terms
for a purchase, a quote, a credit, etc., so CashBook 200 does
not use its own status terms (estimate, quote, posted and
rejected). Instead, it provides the Title box (just below the
status drop down list). In this box, type what you
want to appear at the top of the printed purchase - it can be
whatever you wish.
When you have finished with the purchase, click the Close button
to return to the Purchase List window.
|
|
|
